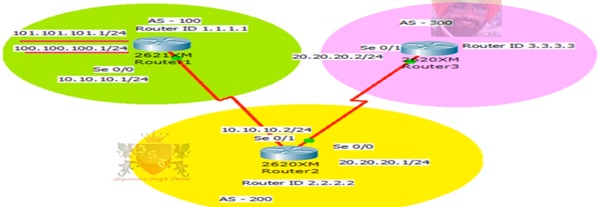
3d.3 # Configure the Border Gateway Protocol (BGP) Lab
1. BGP Neighbors Diagram : -
1) Configuration of Router1
Router(config)# hostname R1
Router1(config)# interface serial 0/0
Router1(config-if)# ip add 10.10.10.1 255.255.255.0
Router1(config-if)# no shutdown
Router1(config-if)# clock rate 64000
Router1(config-if)# exit
!
Router1(config)# interface loopback 0
Router1(config-if)# ip add 100.100.100.1 255.255.255.0
Router1(config-if)# exit
Router1(config)# interface loopback 1
Router1(config-if)# ip add 101.101.101.1 255.255.255.0
Router1(config-if)# exit
!
Router1(config)# router bgp 100
Router1(config-router)# bgp router-id 1.1.1.1
Router1(config-router)# exit
!
Router1(config)# router bgp 100
Router1(config-router)# neighbor 10.10.10.2 remote-as 200
Router1(config-router)# network 100.100.100.0 mask 255.255.255.0
Router1(config-router)# network 101.101.101.0 mask 255.255.255.0
Router1(config-router)# exit
!
2) Configuration of Router2
Router(config)# hostname R2
Router2(config)# interface serial 0/1
Router2(config-if)# ip add 10.10.10.2 255.255.255.0
Router2(config-if)# no shutdown
Router2(config-if)# exit
!
Router2(config)# interface serial 0/0
Router2(config-if)# ip add 20.20.20.1 255.255.255.0
Router2(config-if)# no shutdown
Router2(config-if)# clock rate 64000
Router2(config-if)# exit
!
Router2(config)# router bgp 200
Router2(config-router)# bgp router-id 2.2.2.2
Router2(config-router)# exit
! Router2(config)# router bgp 200
Router2(config-router)# neighbor 10.10.10.1 remote-as 100
Router2(config-router)# neighbor 20.20.20.2 remote-as 300
Router2(config-router)# exit
!
3) Configuration of Router3
Router(config)# hostname R3
Router3(config)# interface serial 0/1
Router3(config-if)# ip add 20.20.20.1 255.255.255.0
Router3(config-if)# no shutdown
Router3(config-if)# exit
!
Router3(config)# router bgp 300
Router3(config-router)# bgp router-id 3.3.3.3
Router3(config-router)# exit
!
Router3(config)# router bgp 300
Router3(config-router)# neighbor 20.20.20.1 remote-as 200
Router3(config-router)# exit
!
3d.4 # Configure the iBGP and eBGP Lab
1. BGP Neighbors Diagram : - 1) Configuration of Router1
Router(config)# hostname R1
Router1(config)# interface serial 0/0
Router1(config-if)# ip add 10.10.10.1 255.255.255.0
Router1(config-if)# no shutdown
Router1(config-if)# clock rate 64000
Router1(config-if)# exit
!
Router1(config)# interface loopback 0
Router1(config-if)# ip add 100.100.100.1 255.255.255.0
Router1(config-if)# exit
Router1(config)# interface loopback 1
Router1(config-if)# ip add 101.101.101.1 255.255.255.0
Router1(config-if)# exit
!
Router1(config)# router bgp 100
Router1(config-router)# bgp router-id 1.1.1.1
Router1(config-router)# exit
!
Router1(config)# router bgp 100
Router1(config-router)# neighbor 10.10.10.2 remote-as 100
Router1(config-router)# network 100.100.100.0 mask 255.255.255.0
Router1(config-router)# network 101.101.101.0 mask 255.255.255.0
Router1(config-router)# exit
!
2) Configuration of Router2
Router(config)# hostname R2
Router2(config)# interface serial 0/1
Router2(config-if)# ip add 10.10.10.2 255.255.255.0
Router2(config-if)# no shutdown
Router2(config-if)# exit
!
Router2(config)# interface serial 0/0
Router2(config-if)# ip add 20.20.20.1 255.255.255.0
Router2(config-if)# no shutdown
Router2(config-if)# clock rate 64000
Router2(config-if)# exit
!
Router2(config)# router bgp 100
Router2(config-router)# bgp router-id 2.2.2.2
Router2(config-router)# exit
!
Router2(config)# router bgp 100
Router2(config-router)# neighbor 10.10.10.1 remote-as 100
Router2(config-router)# neighbor 20.20.20.2 remote-as 200
Router2(config-router)# exit
!
3) Configuration of Router3
Router(config)# hostname R3
Router3(config)# interface serial 0/1
Router3(config-if)# ip add 20.20.20.1 255.255.255.0
Router3(config-if)# no shutdown
Router3(config-if)# exit
!
Router3(config)# router bgp 200
Router3(config-router)# bgp router-id 3.3.3.3
Router3(config-router)# exit
!
Router3(config)# router bgp 200
Router3(config-router)# neighbor 20.20.20.1 remote-as 100
Router3(config-router)# exit
!
# Note: -
The range of the priority values that allow a router to be a candidate are 1 through 255. The priority settings of 0 means that the router does not participate in the election and can never become the DR or BDR.And the last one Routers (Router_B, D, E and Router_F) will have to decide in which, who one will become a DR & BDR after the configuration. You can see from the following commands.
| Neighbor ID | Pri | State | Dead Time | Address | Interface |
|---|---|---|---|---|---|
| 192.168.2.101 | 1 | FULL/BDR | 00:00:30 | 192.168.2.101 | Fa 0/0 |
| 192.168.2.102 | 1 | FULL/DR | 00:00:32 | 192.168.2.102 | Fa 0/0 |
| 192.168.2.103 | 1 | 2 WAY/DROTHER | 00:00:34 | 192.168.2.103 | Fa 0/0 |
RouterF# show ip ospf neighbor
| Neighbor ID | Pri | State | Dead Time | Address | Interface |
|---|---|---|---|---|---|
| 192.168.2.101 | 1 | FULL/BDR | 00:00:36 | 192.168.2.101 | Fa 0/0 |
| 192.168.2.102 | 1 | FULL/DR | 00:00:38 | 192.168.2.102 | Fa 0/0 |
Number of logical connection = N(N-1)/2
Number of logical connection = 10(10-1)/2 = 10(9)/2
Number of logical connection = 90/2 =45
# OSPF metrics
• It can be manually configured and value between 1 – 65,535
• It will be configure the cost based on bandwidth automatically before the configuration.
• IOS can calculate a value based on the generic formula.
Ref – Bw / Int Bw (Default to 100 Mbps)
Ref Bw is a reference of bandwidth.
Int Bw is a interface of bandwidth setting.
Simplify the formula:
=> 100 Mbps / Int – Bandwidth => 100000 / 1 intial Bandwidth
• OSPF calculates the metric for each possible route by adding up the outgoing interface OSPF costs.
• Less cost route is the best path for OSPF metrics.
Note: -
Bandwidth is considered of the exit interface – not on the ingress interface. Also it is sum from Source to Destination
# Debugging command for troubleshooting
• Router# debug ip ospf packet (Function: show hello packet being sent and received on your router)
• Router# debug ip ospf hello (Function: show hello packet being sent and received on your router)
• Router# debug ip ospf adj (Function: show DR and DBR elections on a broadcast and non-broadcast multi – access network)
Be updated into yourself and improve lives through DIT


